Jim Dalen’s Rib JigJim Dalen, a RagWing Parasol builder sent us a copy of an article he wrote for his
local UL club (the Albuquerque Ultralight Association) newsletter.
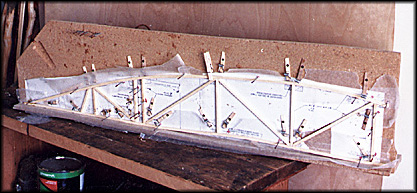
Constructing the wing ribs is still the primary focus in my garage
and I’ve taken some photos of the jig and the assembly process that
might assist another builder. I made the jig from an old section of
preformed countertop. After trimming the excess material, I ended up
with a flat section that is about 16″ X 50″. Nailing and gluing a 1.5″
strip along a factory straight edge at the “wrong side” provided a
perfect 90 degree and straight corner from which to construct the ribs.
A full size rib pattern was then attached to the particle board with
wall paper paste after all key measurements were verified on the
pattern. I started to construct a cam arrangement for alignment during
the rib construction, but found that 8d finishing nails placed into
predrilled 7/64″ holes held the pieces firmly and uniformly in place for
gluing. This jig uses 22 of these “pegs”. The proper placement of the
holes was determined by actual placement and bending of the wood strips.
“See photo # 1). The rib is assembled in the jig by 1st placing the
lower and upper stock in place, fitting and gluing the trailing edge
joint and then fitting, cutting and gluing the remaining stock pieces.
The plans of the Parasol call for the joints in the ribs to just be left
at a 90 degree cut and to rely on the gussets to support the stress at
the joints. I am not comfortable with the resulting gaps so all of the
joints are fit and cut to the proper angel by simply laying the stock
over the existing upper and lower stock at the correct angle as
determined by the plans, marking the correct dimension and angle with a
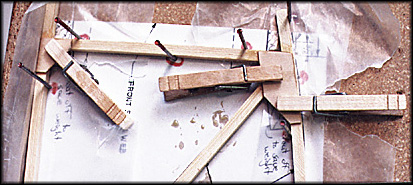
fine lead mechanical pencil and cutting with a hacksaw. (Photo #2 shows
the fine fit possible by using this technique and also illustrated the
positing of the stock by use of the finishing nail pegs.)
After all the stock is glued, the gussets are cut and glued in place.
I am using the EXCEL glue recommended by Rag Wing and find that it
expands as it dries. The plans for the craft call for use of staples to
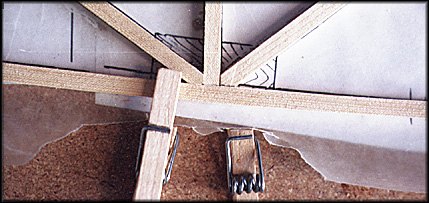
secure the gussets until they are dry but I use wood clothes pins to
clamp each gusset in one or two places. Half of the clothes pin was
shorted to just less than the spring slot and then permanently screwed
in place. After the gusset is cut and glue applied, the top half is
simply slipped under the center spring and then acts as a clamp while
the glue dries. (See photo #3 and compare the clamps to photo #2.)
This jig setup works well for me and the only problem encountered was
another case of pilot error when I didn’t get the waxed paper positioned
correctly and glued a peg to the wood stock! That little error proved
the exceptional adhesive qualities of EXCEL glue.
RagWing Aeroplane Company
A RogerMann.org site


